Thursday, August 16, 2012

How to Make a Paper Flower Medallion

A few months ago I came across a picture of some paper wall art that looked like pretty dahlias and thought… I can totally make that, so I did! I made large ones and small ones and before I knew it I made a lot of them. I brought them into the flower shop and my coworkers loved them! We hung them on a wall in our office and it turned into a pretty spiffy looking bit of wall art.

Over the following weeks our paper dahlias were finding their way into the background of a few of our Facebook pictures and people started asking what they were, if they could buy them and how they could make them, so here’s our how-to (we of course offer them for sale too).
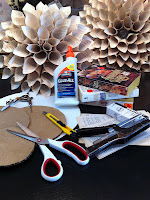

Here’s what you’ll need:
 - Some scrap cardboard
 - A compass with pencil (or something circular to trace around)
 - Stapler and staples
 - Glue (I used Elmer’s, but pretty much any glue works well, especially a hot glue gun)
 - A box cutter or exacto knife
 - A book (or sheet music or scrapbook papers or any kind of pretty paper for your flower)
 - A pair of scissors
 - A piece of wire ~6” (I use 18 gage, but any gage is fine)
 - Something pretty for the center *optional*

Cut out cardboard circles.


Start with your scrap cardboard (I used an old flower box) and use your compass to make a circle (or trace something round). Big circles will make big flowers, small circles small flowers. If you plan to make a few, mixing the sizes creates a fun and interesting look. And though I have yet to try it, I’m sure this craft could be easily adapted to make square or oval shaped flowers. Once you’ve drawn your shape, carefully cut out your circle with your box cutter or exacto knife.


Next select your paper. I was given a large amount of old romance novels that a friend got for free from a local flea market and they’re perfect! I love the ecru color of their pages, so shabby chic, and I don’t feel too terrible about cutting them apart (for some reason the idea of cutting up most books makes me sad… I’m not trying to start another Bonfire of the Vanities here!).

Cut the pages from your book.

The size of the pages of most romance novels is perfect too, around 7” x 4.5” or so, I made one with big magazine pages once and it didn’t look so hot, so if you‘re using a large book, I recommend cutting the pages in half, it will give your flower more petals. Anyway, like I mentioned in the supplies area, any kind of paper will do really, simply chose what you like the look of.
So if you are choosing to violate a book like I did, carefully use your box cutter and run it along the inside of the binding over and over again, removing the pages as you go, to cut all the pages out as whole as possible.


Curling...

Next curl your papers into cones. It took me at least a dozen cones to really get efficient at it and not crinkle my pages.

I made my cones by turning the page horizontal, holding the inside left corner between my left index finger and thumb, and using my opposite hand to turn the page over my holding hand and then I rolled the bottom of the page into a point.


Curling...
Curled.

Then, using my stapler, I stapled my cones along the circumference of my cardboard circle.
Staple your cones to the perimiter.


Make lots and lots of cones.


Once the perimeter was filled with cones I made a lot more cones (no, I didn’t count how many, the number you need will vary depending on how large your circle is) but these I stapled as I went, since my stapler won‘t reach the inside of the circle. Once I have a lot of cones made it’s time to glue.


Overlap your rings of cones.
Get Gluey!
Using my Elmers I ran a bead of glue along the long side of my paper cone, a couple of inches from the top and down to the staple at the bottom. I then pressed my gluey cone to the cardboard, overlapping my first layer of cones. You may overlap them more or less, depending on how full of petals you want your flower to be.


Working my way toward the center I glued circle after circle of cones.


Make some small cones.


Once you are very near the middle and the cones become too long to neatly fit you will want to create some smaller cones. Simply cut your pages in half and roll 5-6 short cones. These can be tricky to roll neatly, but keep at it, they look much better in the center of your flower than a bunch of mangled long cones.

Adding a trinket can be fun!


Now it’s decision time… do I finish my flower in all paper or do I add a fun trinket to the center? When I created lots of these for one wall I mixed it up, some were created with all paper and some I choose an old used halogen light bulb for the center. I’ve been colleting spent light bulbs for years now and I love the bit of shine these add to the middle. You can choose anything really, crystals, an artificial flower, a faux bird’s nest, a glass ornament, whatever works with your décor.

Get gluey again!


If you are choosing to finish the center with some sort of bauble, simply slather it with lots of glue… lots and lots of glue, and press it into the center of your flower.


You're just about done...


Roll a few pages tightly.

If you would like stick to all paper, then I recommend rolling a few half pages very tightly, around a pencil or pen, bending them in half, and gluing them in the center. This creates the most authentic flower look, your tightly rolled pages mimicking the petals at the center of a real dahlia.


Fold the tight rolls in half
and glue them in the center.

Now that you’re done gluing, give your flower ample time to dry, at least overnight. I waited just a few hours once before hanging and I had drips of wet glue running down my paper petals before I knew it!


Also, due to a past cat related smashing incident, I now always dry mine someplace high, where a few select up-to-no-good cats won’t be tempted to take a nap upon them. If you use hot glue, I imagine all this could be avoided, as your flower would dry very quickly.

Phillip Cat:  Known paper flower smasher!!


Add a wire loop to hang it by.
Finally, to the back I took a 6” piece of 18 gage wire, folded it in half, jabbed it through my cardboard and twisted it around itself to make a loop to hang my pretty flower by.


Wall of Paper Flowers


We love this craft, it’s inexpensive, simple, unique, eco-friendly and beautiful! Clustering a bunch together as we did makes a great statement wall or even standing alone it is a lovely piece of art and conversation piece. We hope you give this a try and have fun making your own!!

-Jennifer Kelly


Thursday, August 2, 2012

Something Seussian


So we’ve been pinning like crazy on Pinterest (need an invite? send us an email at steinyourflorist@aol.com or leave a message after this post and we'll send you one) and I stumbled across a picture of swirly pastel sugar cookies, which then inspired a board of many Seussian delights, which then inspired this post, a chance to share my love of all things Seuss with you…


It must relate back to my childhood, my love of Dr. Seuss. Bedtime readings of his whimsical tales and colorful drawings always brought such joy! The Foot Book, Green Eggs and Ham, Hop on Pop, One Fish, Two Fish, Red Fish, Blue Fish, There’s a Wocket in my Pocket (a favorite), and so many more, are all classics that I fell in love with!


The Joyous Leaping of Uncanned Salmon
Cat From the Wrong Side
of the Tracks
Now as an adult I still enjoy the fanciful art of Dr. Seuss. His painting “The Joyous Leaping of Uncanned Salmon” was my desktop background for almost a year and I swear my pet cat Isosceles is his “Cat from the Wrong Side of the Tracks”! His work has inspired the imaginations of people for generations, including myself and some of the other designers here at Stein Your Florist Co.


It’s all about colors and curves for us in our land of Seussian design. Like this topiary arrangement, whose curvy raffia wrapped trunk and large round top, remind us of a truffula tree. And the bits of green hanging amaranthus at the bottom are reminiscent of the crazy hanging hair of Dr. Seuss’ Zlock (behind the clock), Bofa (on the sofa), or the Yeps (on the steps), to name just a few of his creative characters.


Joseph Katz
Another topiary-esque arrangement of Seussy inspiration is this whirly spiral of colorful floral fun. The bright colors are akin to his painting “Every Girl Should Have a Unicorn” or the snazzy sweater of “Joseph Katz.” We think this would be a lovely compliment to a sweets table among delightfully yummy lolli-pops, taffies, and some swirly pastel sugar cookies (why not?)!


Every Girl Should Have a Unicorn
And, if you’ve been reading our other posts, you surely noticed that we love to play dress up… So we put our favorite “doll” Jessi Rose in a bright blue dress, put her hair in playful pig tails with touches of fanciful foliage, and painted her face with pretty pastels. We created a Seussian bouquet for her inspired by a bevy of Dr. Seuss’ work; though, especially by the Nooth Grush (on the tooth brush) with his cute pastel colors and the _ellar (in the cellar) with his lengthy tail from There’s a Wocket in my Pocket.


The bouquet itself consists mainly of rainbow roses, their assortment of colors are bright in the center of a collar of yellow solidego, with a canopy of craspedia, which we like to call golden balls, bobbing about at the top.


The bottom of the bouquet is long and trailing, breaking off into different directions with pops of color from mums, ranunculus, asters, more golden balls, hanging amaranthus, a few berries, something periwinkle that we can’t remember the name of, artificial cherry blossoms, a dahlia, a peony, long streamers of ribbons and the kitchen sink (which of course has a Nink in it).


And how cool are those Seussy silver vases!?! Just like Seuss Landing in Orlando, FL there are no straight lines here. These vases defy gravity and stand upright despite their curvy shape and we filled them with just a few stems of brightly colored artificial gerbera daisies, whose stems have also been Seussified. And just for fun… here’s a few shiny gazing balls :)


Next time you’re feeling blue, or need a little a little joy, inspiration, or fun in your day, visit Dr. Seuss’ world, “where everyone’s a pony and they all eat rainbows and poop butterflies.” My love of Dr. Seuss will endure always, because as the wise man himself said, “Fantasy is a necessary ingredient in living, it’s a way of looking at life through the wrong end of a telescope” and I, for one, enjoy the view.

-Jennifer Kelly

Monday, July 23, 2012

Our New Favorite Thing... It's a Dress Form, Dummies


We’ve been changing our window displays at our Burlington, NJ location, Steins at Sunset Florist, pretty regularly recently. Before we’d only redesign them for the major holidays, but one of our recent purchases has inspired a lot of window flipping lately. It’s a simple dress form.

The ladies at Steins at Sunset Florist love fashion… and what girl doesn’t enjoy playing dress up? So we style our coworker Jessi Rose from time to time to showcase our latest floral creations, usually playing the role of bride, in old prom dresses, colorful makeup and the like. She was even our live model at The Philadelphia Great Bridal Expo back in January 2012. She was the perfect stoic statue atop a pedestal, displaying our beautiful bridal creations; more than a few expo guests touched her arm to see if she was real, followed by a quick and embarrassed “I’m sorry.”

Unfortunately, being a human girl, Jessi Rose can’t stand in our store windows 24/7, so our dress form is one of our new favorite things! We get to play dress up and make fun themed displays at the same time.
Before we dove into an all-out themed vignette, we dressed our dummy in flowers and sewing notions. One of our employees took the dress form home before it even made it to the flower shop and decked it in fabric swatches, vintage buttons and pins, a tape measure, spools of thread and fresh yellow tulips. There was really no reason behind it… we just love playing dress up! This began our dress form love affair.


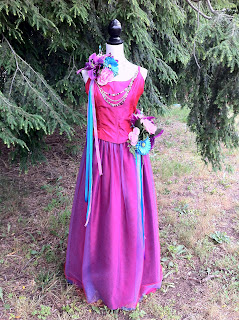
Prom season was our first display. A puffy pink princess dress with bold floral accents and long streamers of ribbon. We added the turquoise accents to the Jessica McClintock dress ourselves, sewing corset-style lacing at the back for extra drama.
 

For the display we pulled in elements of a teenage girl’s bedroom getting ready for her prom date, so we included a mirror with her prom tickets and flower order receipt tucked into the frame, her clutch bouquet on a side table and a pair of high heels kicked over to the side.


Next was graduation season. One of our employees is a graduate of Drexel University, so we had a pretty decent cap, gown and stole. We added an overly dramatic set of tassels (‘cause we love honors) and finished our display with text books, globes, and flowers (of course). You can see more about this display in our post Congratulations Class of 2012.


Then there was Independence Day (we blogged about it in Hooray forthe USA). We added a red, white and blue sash and a big bow to the back of a simple white sun dress (so Sailor Moon *smirk*). A couple of red necklaces, a patriotic corsage and a pocket full of flags and our dummy was ready to party! Our live model Jessi Rose even dressed herself to match the mannequin for the holiday, it was adorable.

Our current display has a tropical theme for the Summer. With a sparkly seashell top, a colorful lei, and hippy hula skirt our dress form is ready for a luau. We finished our vignette with pretty Polynesian accents, colorful tropical flowers and happy tin fish. More than a few customers have commented on our exotic Summer theme, they really seem to like it and we’re happy to bring a bit of the tropics to Burlington, NJ.

We haven’t planned our next window display yet… but we can hardly wait to play dress up again!

Wednesday, June 27, 2012

Hooray for the USA!

Summer is here. Kids are out of school, work atire is a bit more casual, and weekends are filled with trips to the beach, backyard barbecues, and family fun. June is coming to a close and we are getting ready to kick off July with patriotic spirit!


John Adams was the first to describe how Independence Day would be celebrated in a letter to his wife Abigail on July 3, 1776. He described "pomp and parade, with shows, games, sports, guns, bells, bonfires, and illuminations" throughout the United States. Sounds a lot like our modern celebrations... except we tend to have a lot more food and too much to drink ;) And around Steins we of course include flowers!
 
To get into the spirit we've transformed our shop window display (it seems like graduation was there for only a minute) into a patriotic panorama of tried-and-true red, white and blue!
 
 
We draped a flag from the ceiling... which was quite the adventure! Not only did we have to look up proper flag hanging etiquette (the field of stars is to face to the left when viewed from the street when hung in a window) but working a ladder into our tight space was also interesting... Most importantly, no one was hurt.


We dressed our mannequin in a pretty white Summer dress and added a nationalistic red, white and blue sash finished at the back with a big bow and flowing streamers. A couple of long red necklaces, a big patriotic corsage, and a pocket full of flags complete our 4th of July ensamble.


Our fashionable country chair was upcycled from an old wooden chair that was on it's way to the dump. We painted it and then distressed it to give it a shabby chic look and recoved the seat with an old tattered flag. And what's more American than a simple brown Teddy bear?


We finished the window with flowers and plants, more Americana, some stars and stripes, and... is that Bo Obama? We had a nice time putting together the display and we are looking forward to celebrating the holiday. Now lets see some fireworks!