Sunday, October 7, 2012

Oppa Stein Your Florist Style, Our Gangnam Style Parody


Unless you’ve been living under a rock you’ve probably heard South Korean rapper Psy’s infectiously catchy hit song “Gangnam Style,” seen the awesomely entertaining and popular music video, and maybe even busted some of his signature horse-riding dance moves.


Patrick "Psy" Kelly poses with Steins designer Jennifer,
video editor and director, and our mystery
yellow suited dancer.
Gangnam is a district of Seoul, Korea that Psy has likened to Beverly Hills, CA, with lavish lifestyles and posh people. The music video is a comical antithesis of Gangnam’s actual swag with its humorous dance, fashion and lyrics. The song is about the perfect girlfriend who knows when to be refined and when to get wild.


"Psy" with one of his supporting actors
After seeing Psy’s live performance on the Today Show we found ourselves constantly dancing and singing around the shops (the English words as well what we are sure was an unfortunate butchering of the Korean ones). A week after catching the Gangnam Style fever with no cure in sight, we decided to film our own “Gangnam Style” parody, “Oppa Stein Your Florist Style!” Our flowers have a certain swag ;-)

The original video features scenes around the Gangnam district, while ours features our shops, staff, and, of course, flowers.

Patrick gets his unruly Elvis wig Gangnam styled.

Patrick, Stein’s owner and operator, took on the role of Psy, donning an Elvis style wig and some funky colored suit jackets from the local thrift stores. While his dance moves aren’t nearly as on point as Psy’s, he made up for it with lots of energy and beautiful flowers.
"Psy" posing with some of his
dance crew.

The rest of the Steins crew was excited to fill the supporting roles, help behind the scenes, design bouquets, film and edit our spoof. It’s amazing we captured any footage where we weren’t laughing!


Our mystery yellow suited dancer.
One of our top designers, who asked to remain nameless, dressed as the yellow suited dancer. The disguise was so good that people that know her didn’t even recognize her and passers-by stopped in their cars to take pictures.

"Christine" models with the other ladies while
"Psy" screams at his favorite thing... flowers.
We were short one female dancer the day we filmed our version of Psy’s yoga scene, so we convinced Chris, one of our newest employees, to dress as “Christine” in a cute black dress and big curly black wig to do a little bouquet modeling and dancing for us. He’s such a good sport!


Elevator dancer Pat C.
We would like to thank the extra dancers from the community that showed up on the scene while we were filming to do the horsey dance with us… We found ourselves to be attracting quite a crowd while dancing outside the store on the corner of Frankford and Princeton, we must have looked like a flash mob!
 

We had an amazing time filming our parody and we hope you enjoy watching it!! And be sure to subscribe to our YouTube channel, you never know what we’ll be up to next!
 

Friday, September 28, 2012

The Humanization of Flowers


Statice
A few days ago we found a bag of googly eyes here at the shop.  You know, the little white plastic disks with the smaller black disk trapped under clear lens that jiggles and shakes when they move about.

Carnations


Sunflower
 
No idea why we have them… we’re not making a bunch of pipe cleaner animals or anything here!

So we started sticking them on all kinds of silly things, our water cooler, a lamp, and then flowers… that’s when things got ridiculous.
Antherium


Before we knew it we had eyebombed our own store. From roses to liatris, almost every flower in the shop had been humanized.
 
Hydrangea
 
We set up our video camera and about 45 minutes of silly unscripted floral puppetry ensued.


Pom Pon


We always thought our crew was a bit wacky, but now we know for sure!


Heliconia


Some of our "performance" was slightly reminiscent of the talking flowers of Alice in Wonderland (without the lovely singing), but most was just absurd.


Calla Lilies


Iris
We’d like to say that no flowers were harmed in the making of this film, but that would be a lie. Our laughing orange lily didn’t make it (we didn't even get a picture of the poor guy)…
 
while twirling he lost 3 of his 6 petals, but he shall be forever immortalized in the archives of You Tube.


Rainbow Rose


And to think this was all part of a day’s work ;-P


Mum


Check out our video and let us know what you think!


Fuji Mum
Protea
Lisianthus


Liatris


Monday, September 17, 2012

On the Wings of Black Bowls

Stein Your Florist Co.,
the Phoenix florist.
Many of our long time customers know that 11 years ago we had a fire at our Philadelphia location that forced us to close our doors for almost a year. To catch up on that bit of Stein history check out this article that was in the Northeast Times shortly after we reopened.


It was a trying time, to say the least, and it is never too far from memory, but just a few weeks ago while rooting through some Stein storage we found a relic of our post-fire past, a box of black bowls.
 
A traditional arrangement
designed in a black bowl.
Remember when gas stations had those give-aways when you filled the tank? Well that’s what these black bowls were. From the gas stations hundreds made their way to Penn State Gardens, a greenhouse that Steins has a close relationship with (in fact, it used to be owned by Steins years and years ago). Paul, the greenhouse owner, eager to help us get back on our feet upon reopening with a mountain of post-fire debt (insurance is never enough) sold us the bowls at a generous 10 cents each!
A topiary arrangement
designed in a black bowl.


Sure, the bowls were filthy after being stored under greenhouse potting benches for 30+ years, but what’s a little dirt when you have a shop full of floral designers eager to return to their craft? We scrubbed the bowls, filled them with oasis floral foam and let our art take over.


A traditional arrangement
designed in a black bowl.
At a time when we were working in a building still partially under reconstruction and trying to get the word out to our wonderful and loyal customers that we were back (and better than ever!) these simple black bowls became the vessel upon which Steins stayed afloat. They allowed us to focus our resources on flowers and provide our patrons with what Steins has always been known for, beautiful lush arrangements at a great value.

Party centerpieces designed in black bowls.
These bowls are versatile enough to house designs from traditional to ultra-contemporary. We used them for almost everything:  party centerpieces, birthday arrangements, and beautiful everyday designs.

Now, we are happy to have returned to arranging in extravagant glass, impressive ceramic and stylish baskets, but we have found ourselves waxing nostalgic upon rediscovering these simple receptacles.

A kind customer likened our return after the fire to the legendary Phoenix, reborn from the ashes to live again. Thanks to these humble black bowls this Phoenix florist continues to soar.

 
Stein Your Florist Co., the Phoenix florist.

We would like to thank those that helped us through this difficult time… Our friends and family, our wonderful employees that stood by us, as we stood by them, Paul and everyone at Penn State Gardens, John Dorschug and Graebel Van Lines for your support, manpower, boxes and packing supplies, and all our wonderful and valued customers. Because of everyone’s support we have been able to practice our craft for 125 years! Thank you!
 

Tuesday, August 21, 2012

A Petal for Every Wedding Season

So you’ve chosen the date, the venue and the dresses; you know what colors you like, the wedding theme, and the tone you want to set… and now for the flowers. With thousands of varieties and colors available, choosing the proper blooms can seem like a daunting task. Luckily, your local florist is an expert in this arena. At Stein Your Florist Co. we have been assisting brides in these careful decisions for 125 years and our first bit of advice is always the same, choose what you love. Sometimes this is easily accomplished, many popular blooms are available year round, while others are a bit more season specific. It is never impossible to procure out of season flowers, they may be specially grown just for you; however, seasonal flora is typically less expensive and of better quality.

Florists import flowers from around the world, acquiring much of their inventory from South America, California, Hawaii, Holland, Asia, and Africa granting a bevy of beautiful blooms in all seasons. Among the most popular are roses, many varieties of lilies, alstroemeria, bouvardia, carnations, chrysanthemums, freesia, gardenias, snapdragon, stock, gerbera daisies, liatris, iris, lisianthus, stephanotis (a wedding classic), veronica, many varieties of orchids, and tropicals, such as ginger, birds of paradise and protea. These seasonless standbys combined or standing alone create stunning bouquets, centerpieces and venue décor for your wedding day. Consider your colors and theme and have fun designing your dream wedding.

If incorporating the season’s blooms is something you’d like or if the everyday flora just isn’t your scene, then consider the time of year and spice up your wedding bouquets with the finest flowers of the fields. Winter lays claim to stunning amaryllis, asters, daffodils, Dutch, French and Parrot tulips, hyacinths, poinsettias, ranunculus and sweet pea. Much of this flora may sound Springy (especially tulips, hyacinths and daffodils) since we associate them with Easter, but as soon as Spring hits it is simply too warm for these delicate blossoms, but they create a perfect combination for March weddings on the cusp of Spring. Following the vernal equinox we are offered beautiful anemone varieties, lily of the valley, peonies, Queen Anne’s lace, and scabiosa. These flowers offer a wonderfully rich garden feel to your Spring wedding.
Summer brings cockscomb, cornflower, dahlias, and zinnias. Summer blooms are often very bright and fun, they lend a carefree hippie vibe to your otherwise formal wedding. Finally, Fall flora brings us a palette of rusts, reds, oranges, and terra cottas mirroring the trees’ metamorphosis. Summer’s tuberose remains and anemones of a different variety return, with camellia and cosmos. Autumn weddings have a welcoming affect, greeting your guests with a blanket of warm colors and boasting a bountiful harvest.

Your bouquet is your star accessory and one of the first things your guests will notice as you enter your ceremony, it will be in most of your photos and even get its own close up shot. Take time to consider your bouquet and work with your florist to create the perfect combination of blooms. No matter what you chose, the stunning beauty of flowers is always in season.
~
Think you may have you read this somewhere before… It’s possible. We had the honor of originally writing this post as a guest blog spot for our friends at I Just Said "Yes."

Thursday, August 16, 2012

How to Make a Paper Flower Medallion

A few months ago I came across a picture of some paper wall art that looked like pretty dahlias and thought… I can totally make that, so I did! I made large ones and small ones and before I knew it I made a lot of them. I brought them into the flower shop and my coworkers loved them! We hung them on a wall in our office and it turned into a pretty spiffy looking bit of wall art.

Over the following weeks our paper dahlias were finding their way into the background of a few of our Facebook pictures and people started asking what they were, if they could buy them and how they could make them, so here’s our how-to (we of course offer them for sale too).


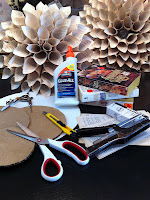
Here’s what you’ll need:
 - Some scrap cardboard
 - A compass with pencil (or something circular to trace around)
 - Stapler and staples
 - Glue (I used Elmer’s, but pretty much any glue works well, especially a hot glue gun)
 - A box cutter or exacto knife
 - A book (or sheet music or scrapbook papers or any kind of pretty paper for your flower)
 - A pair of scissors
 - A piece of wire ~6” (I use 18 gage, but any gage is fine)
 - Something pretty for the center *optional*

Cut out cardboard circles.


Start with your scrap cardboard (I used an old flower box) and use your compass to make a circle (or trace something round). Big circles will make big flowers, small circles small flowers. If you plan to make a few, mixing the sizes creates a fun and interesting look. And though I have yet to try it, I’m sure this craft could be easily adapted to make square or oval shaped flowers. Once you’ve drawn your shape, carefully cut out your circle with your box cutter or exacto knife.


Next select your paper. I was given a large amount of old romance novels that a friend got for free from a local flea market and they’re perfect! I love the ecru color of their pages, so shabby chic, and I don’t feel too terrible about cutting them apart (for some reason the idea of cutting up most books makes me sad… I’m not trying to start another Bonfire of the Vanities here!).

Cut the pages from your book.

The size of the pages of most romance novels is perfect too, around 7” x 4.5” or so, I made one with big magazine pages once and it didn’t look so hot, so if you‘re using a large book, I recommend cutting the pages in half, it will give your flower more petals. Anyway, like I mentioned in the supplies area, any kind of paper will do really, simply chose what you like the look of.
So if you are choosing to violate a book like I did, carefully use your box cutter and run it along the inside of the binding over and over again, removing the pages as you go, to cut all the pages out as whole as possible.


Curling...

Next curl your papers into cones. It took me at least a dozen cones to really get efficient at it and not crinkle my pages.

I made my cones by turning the page horizontal, holding the inside left corner between my left index finger and thumb, and using my opposite hand to turn the page over my holding hand and then I rolled the bottom of the page into a point.


Curling...
Curled.

Then, using my stapler, I stapled my cones along the circumference of my cardboard circle.
Staple your cones to the perimiter.


Make lots and lots of cones.


Once the perimeter was filled with cones I made a lot more cones (no, I didn’t count how many, the number you need will vary depending on how large your circle is) but these I stapled as I went, since my stapler won‘t reach the inside of the circle. Once I have a lot of cones made it’s time to glue.


Overlap your rings of cones.
Get Gluey!
Using my Elmers I ran a bead of glue along the long side of my paper cone, a couple of inches from the top and down to the staple at the bottom. I then pressed my gluey cone to the cardboard, overlapping my first layer of cones. You may overlap them more or less, depending on how full of petals you want your flower to be.


Working my way toward the center I glued circle after circle of cones.


Make some small cones.


Once you are very near the middle and the cones become too long to neatly fit you will want to create some smaller cones. Simply cut your pages in half and roll 5-6 short cones. These can be tricky to roll neatly, but keep at it, they look much better in the center of your flower than a bunch of mangled long cones.

Adding a trinket can be fun!


Now it’s decision time… do I finish my flower in all paper or do I add a fun trinket to the center? When I created lots of these for one wall I mixed it up, some were created with all paper and some I choose an old used halogen light bulb for the center. I’ve been colleting spent light bulbs for years now and I love the bit of shine these add to the middle. You can choose anything really, crystals, an artificial flower, a faux bird’s nest, a glass ornament, whatever works with your décor.

Get gluey again!


If you are choosing to finish the center with some sort of bauble, simply slather it with lots of glue… lots and lots of glue, and press it into the center of your flower.


You're just about done...


Roll a few pages tightly.

If you would like stick to all paper, then I recommend rolling a few half pages very tightly, around a pencil or pen, bending them in half, and gluing them in the center. This creates the most authentic flower look, your tightly rolled pages mimicking the petals at the center of a real dahlia.


Fold the tight rolls in half
and glue them in the center.

Now that you’re done gluing, give your flower ample time to dry, at least overnight. I waited just a few hours once before hanging and I had drips of wet glue running down my paper petals before I knew it!


Also, due to a past cat related smashing incident, I now always dry mine someplace high, where a few select up-to-no-good cats won’t be tempted to take a nap upon them. If you use hot glue, I imagine all this could be avoided, as your flower would dry very quickly.

Phillip Cat:  Known paper flower smasher!!


Add a wire loop to hang it by.
Finally, to the back I took a 6” piece of 18 gage wire, folded it in half, jabbed it through my cardboard and twisted it around itself to make a loop to hang my pretty flower by.


Wall of Paper Flowers


We love this craft, it’s inexpensive, simple, unique, eco-friendly and beautiful! Clustering a bunch together as we did makes a great statement wall or even standing alone it is a lovely piece of art and conversation piece. We hope you give this a try and have fun making your own!!

-Jennifer Kelly